Now Playing with Spotify API and Next.js API Routes
Table of Contents
Create a Spotify Application
The first step is creating a Spotify application to retrieve credentials for authentication.
- Go over to the Spotify Developer Dashboard and log in or create an account if you have not already.
- Click Create an App.
- Fill out the Name and Description and click Create.
- Copy down the Client ID.
- Click Show Client Secret and copy it down.
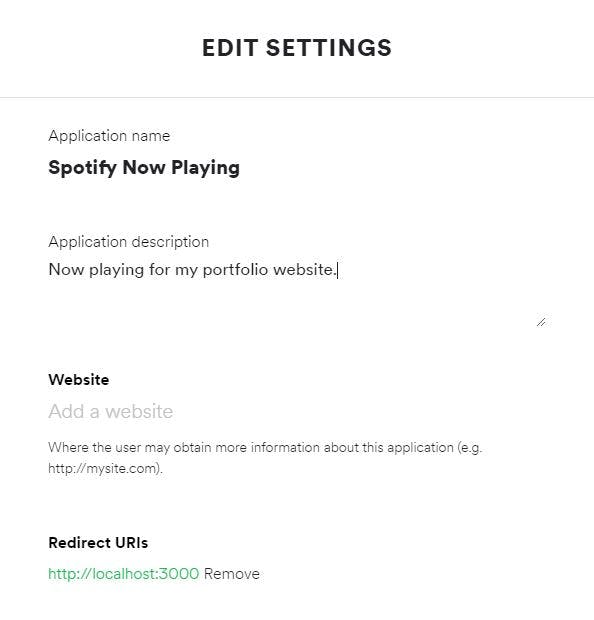
- Click Edit Settings. and add
http://localhost:3000as the redirect URI.

After completing all these steps, you will have properly configured your Spotify application and we can move to authentication.
Authentication
Although there are many ways to authenticate with the Spotify API, we will be using the Authorization Code Flow since we only need the permission granted once.
We need to have our new Spotify application request authorization by logging in with our Spotify account with whatever scopes we need.
- For more information about Spotify API scopes, you can visit their documentation on scopes.
Below is an example of what the authorization request URL would look like. You would replace the CLIENT_ID with your Client ID and the SCOPE# with the ones you want to access. For our purposes, we only needed to use the one scope user-read-currently-playing.
https://accounts.spotify.com/authorize?client_id=CLIENT_ID&response_type=code&redirect_uri=http%3A%2F%2Flocalhost:3000&scope=SCOPE1%20SCOPE2
After visiting this URL and authorizing, you will be redirected to your redirect URI and there will be a CODE appended to the URL. Copy down the CODE because we will need this to retrieve the Refresh Token.
http://localhost:3000/callback?code=CODE
Before we retrieve the Refresh Token we need to generate a Base 64 encoded string that contains our Client ID and Client Secret in the format of CLIENT_ID:CLIENT_SECRET. We can easily do this by using base64encode.org.
Afterwards, we can retrieve the Refresh Token using the curl command with our Base 64 encoded CLIENT_ID:CLIENT_SECRET and CODE below in our terminal.
curl -H "Authorization: Basic ENCODED-CLIENT_ID:CLIENT_SECRET" -d grant_type=authorization_code -d code=CODE -d redirect_uri=http%3A%2F%2Flocalhost:3000 https://accounts.spotify.com/api/token
The command will return a response that contains the Refresh Token. Copy the Refresh Token as we need this to use the Spotify API.
Environment Variables
Next.js has built-in support for loading environment variables from .env.local, so we will create a .env.local file in our project's root directory and declare our variables. Below is an example of what the .env.local file would look like.
Replace the CLIENT_ID, CLIENT_SECRET, and REFRESH_TOKEN with your values.
SPOTIFY_CLIENT_ID=CLIENT_ID
SPOTIFY_CLIENT_SECRET=CLIENT_SECRET
SPOTIFY_REFRESH_TOKEN=REFRESH_TOKEN
For more information about Next.js environment variables, you can visit their documentation on Environment Variables.
Next.js API Routes
By using our three environment variables, we can request an Access Token to securely request data from the Spotify API.
import { URLSearchParams } from 'url';

const SPOTIFY_CLIENT_ID = process.env.SPOTIFY_CLIENT_ID;
const SPOTIFY_CLIENT_SECRET = process.env.SPOTIFY_CLIENT_SECRET;
const SPOTIFY_REFRESH_TOKEN = process.env.SPOTIFY_REFRESH_TOKEN;

if (!SPOTIFY_CLIENT_ID || !SPOTIFY_CLIENT_SECRET || !SPOTIFY_REFRESH_TOKEN) {
  throw new Error('Missing Spotify environment variables');
}

const BASIC = Buffer.from(`${SPOTIFY_CLIENT_ID}:${SPOTIFY_CLIENT_SECRET}`).toString('base64');
const NOW_PLAYING_ENDPOINT = `https://api.spotify.com/v1/me/player/currently-playing`;
const TOKEN_ENDPOINT = `https://accounts.spotify.com/api/token?`;

const getAccessToken = async () => {
  const TOKEN_URL =
    TOKEN_ENDPOINT +
    new URLSearchParams({
      grant_type: 'refresh_token',
      refresh_token: SPOTIFY_REFRESH_TOKEN,
    });
  const response = await fetch(TOKEN_URL, {
    headers: {
      Authorization: `Basic ${BASIC}`,
      'Content-Type': 'application/x-www-form-urlencoded',
    },
    method: 'POST',
  });

  return response.json();
};

export const getNowPlaying = async () => {
  const { access_token } = await getAccessToken();

  return fetch(NOW_PLAYING_ENDPOINT, {
    headers: {
      Authorization: `Bearer ${access_token}`,
    },
  });
};

export default async (_, res) => {
  res.setHeader('Cache-Control', 'public, s-maxage=60, stale-while-revalidate=30');
  const response = await getNowPlaying();

  if (response.status === 204 || response.status > 400) {
    return res.status(200).json({ isPlaying: false });
  }

  const track = await response.json();
  if (track.currently_playing_type !== 'track') {
    return res.status(200).json({ isPlaying: false });
  }

  const album = {
    name: track.item.album.name,
    href: track.item.album.external_urls.spotify,
    image: {
      height: track.item.album.images[0].height,
      href: track.item.album.images[0].url,
      width: track.item.album.images[0].width,
    },
  };
  const artists = track.item.artists.map((artist) => ({
    name: artist.name,
    href: artist.external_urls.spotify,
    id: artist.id,
  }));
  const href = track.item.external_urls.spotify;
  const isPlaying = track.is_playing;
  const title = track.item.name;

  return res.status(200).json({
    album,
    artists,
    href,
    isPlaying,
    title,
  });
};
API Response
If everything has been setup correctly, you should see a response similar to the one below by running yarn dev or npm dev and then visiting http://localhost:3000/api/spotify-now-playing . This route will return with information about the song we are currently playing.
{
  "album": {
    "name": "Perfect Blue",
    "href": "https://open.spotify.com/album/1Mfj9noQoF5wq6VTOm21So",
    "image": {
      "height": 640,
      "href": "https://i.scdn.co/image/ab67616d0000b2739d06737d7426073aa8d6e448",
      "width": 640
    }
  },
  "artists": [
    {
      "name": "DJ Okawari",
      "href": "https://open.spotify.com/artist/34QbYbTlUCLkZsQ8QmacV9",
      "id": "34QbYbTlUCLkZsQ8QmacV9"
    },
    {
      "name": "Kie Katagi from jizue",
      "href": "https://open.spotify.com/artist/3BChsM2TrDzLQG2RqQEsdl",
      "id": "3BChsM2TrDzLQG2RqQEsdl"
    }
  ],
  "href": "https://open.spotify.com/track/6nA7cARxmcLmhVgqfhg9PQ",
  "isPlaying": true,
  "title": "SAKURA Tears"
}
The component in my footer is just an example of what you can do with this response data.